A Simple and Practical Explanation of firstChild, childNodes, nodeValue
I recently had an exercise where I was asked to manipulate nodes using firstChild, childNodes, and nodeValue. In my search to better understand these I found many sites explaining the technical jargon behind them and also providing somewhat complex examples of their uses.
However. I was not able to find a simple, practical, "newbie" example in order to better understand the root concept itself.
So in my failure to find this, I decided to write a brief post showing and explaining these three properties in use.
Our HTML Example
So let's start with this HTML file. We will access certain nodes within this file using firstChild, childNodes, and nodeValue:
    <head>
        <nav class="nav-item">
            <a href="#">Menu Item</a>
        </nav>
    </head>

    <body>
    <section>
        <div>
            <a href="#">Link 2</a>
        </div>

        <div>
            <a href="#">Link 3</a>
        </div>

        <div>
            <ul>
                <li>First</li>
                <li>Second</li>
                <li>Third</li>
                <li>Fourth</li>
            </ul>
        </div>

        <div>
            <a href="#">Link 4</a>
        </div>
    </section>
    </body>

</html>
So at a quick glance, we have four links and an unordered list with four list items.
firstChild
Let's look at this Script:
var firstExample = document.getElementsByTagName('a')[1];
firstExample.firstChild.nodeValue = "Link 10";
For our first example we create a variable called firstExample that will access the second link on the page (note the 'a' tag and the [1] (because we start at 0, this will be the second link).
We then take this variable and add on .firstChild. This will look at this 'a' tag and access it's first child which is going to be the link name.
We then add on .nodeValue which will access the value of this firstChild which is the text, 'Link 2'.
Finally we take that nodeValue and change it to say 'Link 10' instead.
childNodes
Next, we will look at this Script:
var secondExample = document.getElementsByTagName('ul')[0];
secondExample.childNodes[1].innerText = 'Check it out';
For our second example we create a variable called secondExample that will access the very first 'ul' tag on the page (note the [0]).
We then take this variable and add on .childNodes. This will look at this 'ul' tag and give us access to its children (the list items).
Important: Why did we not use [0] for the first child node? Because, this actually gives us access to the whitespace between the end of the 'ul' tag and the first 'li' tag (an explanation of this can be abundantly found on a Google search). So [0] gives us whitespace, [1] gives us the first item, [2] gives us the next whitespace, [3] gives us the second item, etc. From what I have read this varies in different browsers????
We then add on .innerText which will access the value of this childNode, which is the first list item called 'First.'
Finally we take that text and change it to say 'Check it out' instead.
nodeValue
So what if I enter this:
var thirdExample = document.getElementsByTagName('a')[2];
thirdExample.nodeValue = "The Third link";
Will this work? Will this change the text of the third link to 'The Third Link'?
No it will not.
Why?
Because the nodeValue is the anchor tag (an element). If you change the second line to say alert(thirdExample.nodeValue);, then you will get null. You cannot treat an element (anchor tag) like text. If you put in nodeName in the place of nodeValue, you can see it return an 'A' telling us it is an anchor tag.
So what we need to do is look at the nodeValue of the firstChild of the anchor tag, and it will give us access to the actual text of the link as seen here:
var thirdExample = document.getElementsByTagName('a')[2];
thirdExample.firstChild.nodeValue = "The Third link";
Result
Here is a snapshot of the changes we made above:
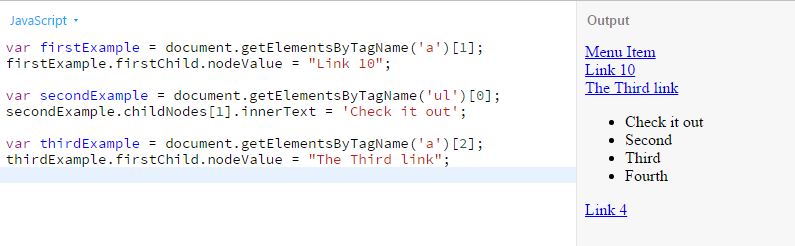
In addition, here is a link to this exercise in JS Bin so that you can manipulate these yourself.
Conclusion
I hope the article was helpful for those of you new to these property types. Please feel free to add to the dialogue in the comments below!!
**This article is to provide basic and practical examples of these properties for those who may be new to them. There is of course much more to be said (such as exceptions, technical considerations, etc.), however, this was not the intention of the article, and there are many sites out there to explain these in more depth.
----------
** This article may contain affiliate links. Please read the affiliate disclaimer for more details.

Travis of
Travis Media


You May Also Like

Become a Web Developer From Scratch in 2023
The Exact Blueprint… The Exact Course… And How To Land …

How To Update Your GitHub Personal Access Token (and add origin)