· Travis Rodgers · Tech · 13 min read
The Ultimate Guide To Blockchain Development For Developers in 2022
- Part 1: Hardhat Is Where To Begin Blockchain Development
- Bootsrapping Your Smart Contract Environment With Hardhat.js
- 1. Install Hardhat.js
- 2. Bootstrap the project
- 3. View the available tasks
- 4. The Smart Contract
- TIP #1: Learn Solidity With This Resource
- TIP #2: Use The Remix IDE for Writing Solidity
- 5. Testing Your Smart Contract
- 6. Deploying Your Smart Contract
- HardHat Conclusion
- Part 2: Ethers.js Is How To Display Your Contract Logic
- Building A Web Interface With Using Ethers.js
- 1. Install Ethers.js
- 2. Connect To Metamask (and to Ethereum)
- 3. Talking To Your Smart Contract
- 4. A Working Example
- Conclusion
Becoming a Blockchain developer can seem a daunting task in the big picture, even for developers.
Why?
Because there are so many random tools involved. There’s the Truffle suite, Hardhat, Waffle, Web3.js, ethers.js, MetaMask, Solidity, the Remix IDE, and so on.
Which one should you start with?
How do they all fit together?
Do you really need to know them all?
Well, I’m going to simplify this for you in this guide and walk you step by step through getting started as a Blockchain developer.
And this guide is FOR DEVELOPERS. If you have no clue how to code, then completing a basic web development course first would be a prerequisite.
But if you know basic JavaScript or a similar language and want to break into the Blockchain industry, then this guide will walk you through the tools you need and how they work.
Ready?
Good. So where should you begin?
With Hardhat.js!
Watch the Video?
Before we get started, if you prefer video, checkout the full tutorial here on YouTube.
Otherwise, continue reading.
Part 1: Hardhat Is Where To Begin Blockchain Development
Hardhat will get you 50% of the way there.
Why do I say that?
Because with one simple Hardhat command you can bootstrap your entire smart contract environment!
This will generate:
- A sample contract
- A test for that sample contract
- A sample script that deploys the contract
- Command-line tasks to do all the things.
Let’s look at each of these individually.
Bootstrapping Your Smart Contract Environment With Hardhat.js
1. Install Hardhat.js
Open up a brand new blank folder and create a new folder in it called contract. Change directory into it.
mkdir contract
cd contract
Now create a package.json file (be sure you have Node.js installed):
npm init -y
And then install Hardhat:
npm install --save-dev hardhat
2. Bootstrap the project
To generate the project, run
npx hardhat
For the prompts you’ll want to choose “Create a basic sample project”, but to create that sample project you’ll need a few more dependencies. It will prompt you for these. Just accept. They include the following packages:
- @nomiclabs/hardhat-waffle
- ethereum-waffle
- chai
- @nomiclabs/hardhat-ethers
- ethers
These extra packages make hardhat compatible with tests built with Waffle (a simple smart contract testing library). Ethers.js is a JavaScript library that allows you to interact with Ethereum.
3. View the available tasks
Run npx hardhat to see the tasks you can run.
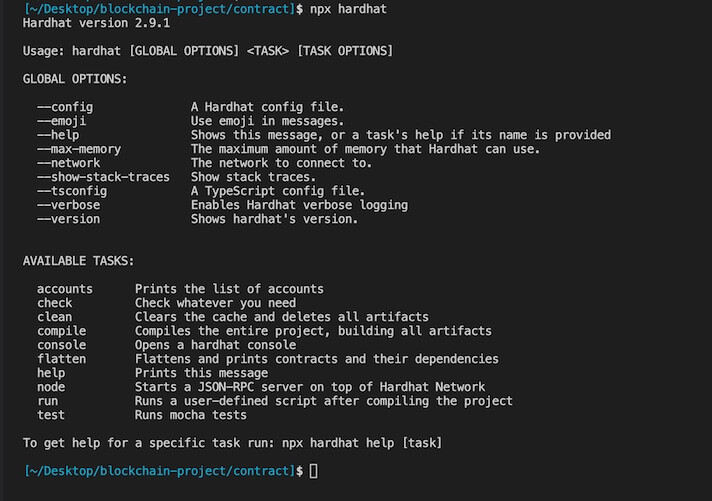
For example, to list accounts, run npx hardhat accounts.
4. The Smart Contract
A sample smart contract can be found in contracts/Greeter.sol.
This contract:
- Takes a greeting as a parameter when it’s deployed.
- Has a function named greet() that returns the greeting
- Has a function named setGreeting() that allows you to change the greeting.
That’s it. A very simple contract. BUT, it’s very powerful as it allows you to learn all of the processes around a contract by being part of the Hardhat.js bootstrap project. We’ll see this in a minute when we get into testing and deploying.
To compile the contract, run npx hardhat compile. This creates artifacts you’ll need for your application including…
- For EVM (Ethereum Virtual Machine) to be able to run your contract, it needs to be in bytecode. The compiler supplies this.
- Also, the compiler will produce what’s called an Application Binary Interface (ABI) which you’ll need for your application to understand the contract and call the contract’s functions. The JS library will read the ABI allowing you to call your smart contract’s functions from your web app interface.
These both were produced in the compiled artifact which can be found at artifacts/contracts/Greeter.sol/Greeter.json. Take a look at the bytecode there and also you’ll see all your contract’s functions listed in the ABI.
TIP #1: Learn Solidity With This Resource
After you work through the below section on how to test and deploy this contract, pause and take a week to learn Solidity.
I searched all over YouTube for free videos but they were either outdated, too short to get anything out of, or too much extra technology included making it confusing.
You need to really nail down Solidity and Solidity alone. The smart contract is the key concept to Blockchain development. Web3.js or ethers.js are just web development tools that allow you to interact with your contract. Your contract is at the center.
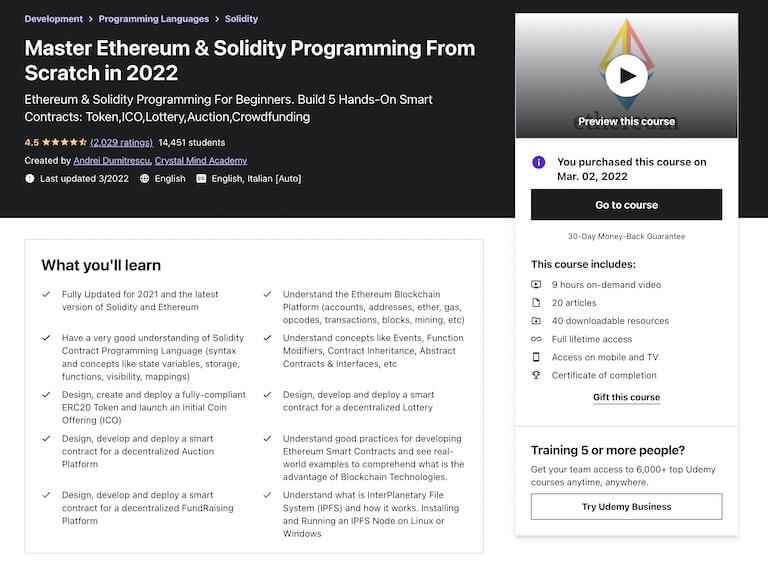
So here is the course I can personally recommend as I took it myself. It is up to date, only 9 hours long, thorough, and has a handful of really, really practical contract projects.
So take a week to work through this course, and then return here for your next steps.
Here’s the course: Master Ethereum & Solidity Programming From Scratch in 2022
TIP #2: Use The Remix IDE for Writing Solidity
You should write Solidity in a browser-based IDE called Remix.
Why? Because it has all the tools you need already built-in to write, compile, and test your contract. And by test, I don’t mean writing tests like the next section below, but actually being able to create, read, update, and delete data and seeing how it work on a virtually deployed smart contract.
Then, when you are done, transfer it back to VS Code.
You can use the Solidity extension in VS Code, which provides many of the same features, but Remix really is designed well for the actual writing of smart contracts.
You’ll learn how to use Remix in the above-mentioned Udemy course if you take it, or do a quick YouTube search to get the basics down.
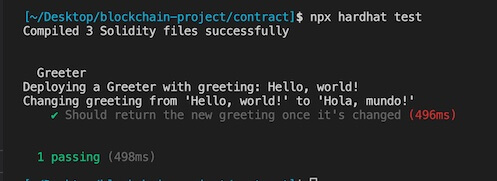
5. Testing Your Smart Contract
You cannot alter a smart contract once it’s deployed. Thus, you’ll want to test it thoroughly before you actually deploy to a production scenario.
If you look in test/sample-test.js you’ll see that the tests use Waffle and Ethers.js…
- Waffle: Tests using Waffle are written in Mocha alongside Chai which are, as you probably already know, popular JS testing libraries.
- Ethers.js: This is a JS library for interacting with the Ethereum Blockchain and its ecosystem. Though it’s used in the web application on the front end, we can use it in testing for direct interaction with the smart contract.
This file has one test that checks that the greeting is returned when it is changed. See how ethers is used to create an object of the smart contract by which to interact with it?
To run your tests use the following command:
npx hardhat test
6. Deploying Your Smart Contract
Finally, you’ll want to deploy this smart contract. Luckily, there is a sample-script file in the scripts folder that will do it for us.
You can run the script with:
npx hardhat test
Note that your script passes in a greeting as the contract requires.
However, this is an in-memory instance of the deployment.
A better approach (other than using an actual testing network like Ropsten) is to run the Hardhat Network in standalone mode so that you can connect to it with external clients.
To do this, run
npx hardhat node
The 20 accounts that were listed earlier with the npx hardhat accounts command are NOW listed with private keys for you to use with, say, Metamask. You’ll want to leave this server running.
You’ll want to add one of these accounts to your Metamask browser extension. Let’s add the first one. Here are the instructions:
- First, let’s add the Hardhat network to Metamask. Go to Settings > Networks > Add Network. Enter in localhost for the Name, http://localhost:8545 for the New RCP Url, and 31337 for the Chain Id.
- Next, we want to import one of the accounts generated when you ran the
npx hardhat nodecommand. Go to Import Account and enter in the first account’s Private Key to add the account.
Never use any of these accounts in production. They are the same for all hardhat users and only for development scenarios.
The npx hardhat node command that you ran exposes a JSON-RPC interface to the Hardhat Network and you can use http://localhost:8545 to connect to it (which we just added to Metamask).
NOW, while this node is running, you can deploy your contract to it by opening a new terminal and running:
npx hardhat run scripts/sample-script.js --network localhost
Now your contract has been deployed to your localhost network that we added to Metamask.
Keep note of the generated contract’s address as you’ll need it for your web app.
HardHat Conclusion
Do you see the power of Hardhat? It gives us everything we need to write a new smart contract, test it, and deploy it. All that’s left is for you to replace the smart contract and tests with your own!
Part 2: Ethers.js Is How To Display Your Contract Logic
Now that your smart contract is created, tested, and deployed, you want others to be able to interact with it.
If you created a smart contract where people can invest their money and earn interest, you’d want an interface by which people can do so, right?
Most decentralized apps need a web interface so that people can interact with them.
Now how can your web app talk to your smart contract? How can it talk to the blockchain?
It does this with a JavaScript library called Ethers.js.
The web app can be built with Vanilla JS, but it’s more popular to use a library like React.js.
So let’s walk through the steps needed to connect your deployed smart contract to your React web application.
Building A Web Interface With Using Ethers.js
1. Install Ethers
Install ethers with:
npm install ethers
And import it in your project:
import { ethers } from "ethers";
2. Connect To Metamask (and to Ethereum)
The Metamask browser extension actually:
- Provides a connection to the Ethereum network (a Provider)
- Holds your private key and can sign things (a Signer)
In fact, the browser injects a global API into websites visited by its users at window.ethereum.
Per the documentation, for your web app to connect to Metamask you’ll need the following code (and I’ve adapted it for a simple React scenario):
// A Web3Provider wraps a standard Web3 provider, which is
// what MetaMask injects as window.ethereum into each page
const provider = new ethers.providers.Web3Provider(window.ethereum)

// The MetaMask plugin also allows signing transactions to
// send ether and pay to change state within the blockchain.
// For this, you need the account signer...
const signer = provider.getSigner()

useEffect(() => {
  const requestAccounts = async () => {
    // MetaMask requires requesting permission to connect users accounts.
    await provider.send("eth_requestAccounts", []);
  }
  requestAccounts()
}, [])
The Provider is read-only and allows you to access the blockchain. You can run commands such as:
- Getting the balance of the contract (or a wallet if you use a wallet address).
await provider.getBalance("0xe7f1725E7734CE288F8367e1Bb143E90bb3F0512");
- Get transaction count
await provider.getTransactionCount("0xe7f1725E7734CE288F8367e1Bb143E90bb3F0512");
- Get the best guess at gas price to use in a transaction
gasPrice = await provider.getGasPrice()
The Signer holds your private key and is used to sign messages and transactions and send signed transactions to the Ethereum Network to execute state-changing operations. You can run commands such as:
- Send 1 Ether to Yours Truly:
const tx = signer.sendTransaction({
    to: "travismedia.eth",
    value: ethers.utils.parseEther("1.0")
});```

<h3 id="20220302-talking">3. Talking To Your Smart Contract</h3>

To interact with your contract, you need three things:

1. The contract address
2. The ABI
3. A Contract Object to work with.

First, you received your contract address when you deployed it. Use that.

Second, you'll need to grab the ABI out of your artifacts JSON file (Greeter.json).

Finally, you'll need to create a contract Object. And as arguments, you'll include the contract address, the ABI, and the signer. It all looks like this:

```javascript
// You can also use an ENS name for the contract address
const myAddress = "myContractAddress"; //replace with yours

// The ERC-20 Contract ABI, which is a common contract interface
// for tokens (this is the Human-Readable ABI format)
const abi = [
    {
      "inputs": [
        {
          "internalType": "string",
          "name": "_greeting",
          "type": "string"
        }
      ],
      "stateMutability": "nonpayable",
      "type": "constructor"
    },
    {
      "inputs": [],
      "name": "greet",
      "outputs": [
        {
          "internalType": "string",
          "name": "",
          "type": "string"
        }
      ],
      "stateMutability": "view",
      "type": "function"
    },
    {
      "inputs": [
        {
          "internalType": "string",
          "name": "_greeting",
          "type": "string"
        }
      ],
      "name": "setGreeting",
      "outputs": [],
      "stateMutability": "nonpayable",
      "type": "function"
    }
  ];

// The Contract object
const myContract = new ethers.Contract(myAddress, abi, signer);
Once you have that object, you can call the contract’s methods:
balance = await myContract.greet()
balance = await myContract.setGreeting("my new greeting)
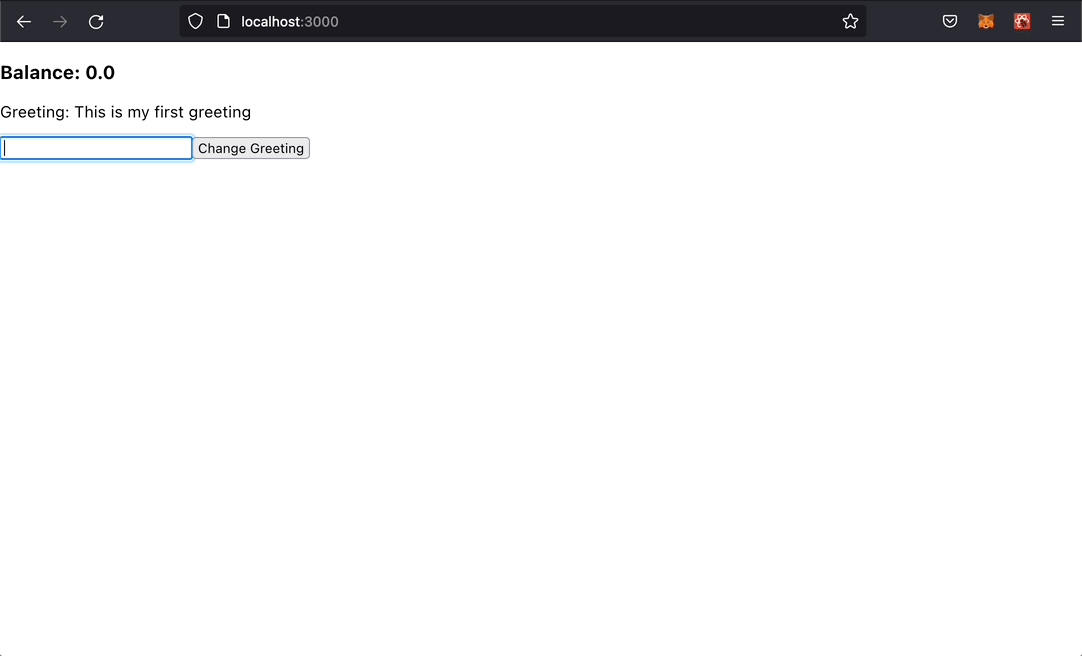
4. A Working Example
So if you are running your Hardhat Network node, have deployed your contract, created the Metamask account, and the other instructions above, you should be able to spin up a simple React app to READ your greeting from the deployed smart contract and to SET A NEW greeting via a transaction on the blockchain.
It will work simply like this:
And the code for this looks like this:
import React, { useState } from 'react';
import { ethers } from "ethers";
import { useEffect } from "react";

function App() {
  const [balance, setBalance] = useState();
  const [greet, setGreet] = useState('');
  const [message, setMessage] = useState('');

  const provider = new ethers.providers.Web3Provider(window.ethereum)
  const signer = provider.getSigner()

  const address = "0x5FbDB2315678afecb367f032d93F642f64180aa3";

  // ABI copied from our compiled smart contract
  const abi = [
    {
      "inputs": [
        {
          "internalType": "string",
          "name": "_greeting",
          "type": "string"
        }
      ],
      "stateMutability": "nonpayable",
      "type": "constructor"
    },
    {
      "inputs": [],
      "name": "greet",
      "outputs": [
        {
          "internalType": "string",
          "name": "",
          "type": "string"
        }
      ],
      "stateMutability": "view",
      "type": "function"
    },
    {
      "inputs": [
        {
          "internalType": "string",
          "name": "_greeting",
          "type": "string"
        }
      ],
      "name": "setGreeting",
      "outputs": [],
      "stateMutability": "nonpayable",
      "type": "function"
    }
  ];

  const contract = new ethers.Contract(address, abi, signer);

  useEffect(() => {
    const requestAccounts = async () => {
      await provider.send("eth_requestAccounts", []);
    }
    const getBalance = async () => {
      const balance = await provider.getBalance("0xe7f1725E7734CE288F8367e1Bb143E90bb3F0512");
      setBalance(ethers.utils.formatUnits(balance, 18));
    }
    const getGreeting = async () => {
      const greeting = await contract.greet();
      setGreet(greeting);
    }
    requestAccounts()
    getBalance()
    getGreeting()
  }, [])

  const handleChange = (e) => {
    setMessage(e.target.value);
  };

  const changeGreeting = async (e) => {
    e.preventDefault();
    await contract.setGreeting(message)
    setGreet(message);
    setMessage('');
  }

  return (
    <>
    <h3>Balance: {balance ? balance : "No balance"}</h3>
    <p>Greeting: {greet ? greet : ''}</p>
    <form onSubmit={changeGreeting}>
    <input type="text" name="message" onChange={handleChange} value={message} />
    <button>Change Greeting</button>
    </form>
    </>
  );
}

export default App;
Conclusion
There you have it, a developer’s guide to learning Blockchain Development.
We looked at the importance of Hardhat in creating the smart contract ecosystem as well as the use of Ethers.js in a React project to make our contract available to users in a web interface.
Are you planning to learn Blockchain development? Let’s discuss below.