Pulumi Tutorial: Automate Kubernetes Deployments and Operations with this Complete Guide
What is Pulumi?
To understand Pulumi, you have to understand Infrastructure as Code.
I love Red Hat’s simple definition: “Infrastructure as Code (IaC) is the managing and provisioning of infrastructure through code instead of through manual processes.”
IaC allows you to describe your infrastructure as code, version control it with Git, and have it produce the same results with each deployment.
Examples include AWS CloudFormation, Azure ARM templates, Terraform, and … Pulumi. The first two are specific to that cloud environment while the latter two are cloud agnostic.
And what sets Pulumi apart from Terraform is it allows you to write and maintain your code in a language of your choosing (Go, Python, Javacript, C#, etc.). There are additional perks with Pulumi like state management and support for cloud native technologies, but we won’t get in the weeds here.
Kubernetes Management With Pulumi
In addition to services like AWS, Azure, etc., there’s a Pulumi SDK for programming against Kubernetes, provisioning clusters, configuring and deploying applications, and maintaining/updating it all.
This is what we’ll target specifically in this tutorial.
Setup
First, knowledge of Kubernetes is required. Pulumi doesn’t teach you Kubernetes. It gives you tools to better manage it.
Next, you’ll need to install Pulumi:
Next, we’ll be using Python for these examples so you’ll need to be sure Python is installed.
And finally, you’ll need a Kubernetes cluster. If you don’t have one, then you can download Docker Desktop (which you’ll have to enable Kubernetes on) or perhaps an easier option, Kind. I’ll be using Docker Desktop’s Kubernetes.
Learn Syntax the Easy Way
Well, you already know Python (or whatever language you are using).
But if you are already familiar with kubernetes yaml, then the best way to learn Pulumi is to use the kube2pulumi converter.
Just paste in your yaml and have it instantly converted to the Pulumi language of your choice.
For instance, let’s take the deployment yaml used to deploy an instance of Ghost CMS:
apiVersion: apps/v1beta1
kind: Deployment
metadata:
  name: blog
  labels:
    app: blog
spec:
  replicas: 1
  selector:
    matchLabels:
      app: blog
  template:
    metadata:
      labels:
        app: blog
    spec:
      containers:
        - name: blog
          image: ghost:2.6-alpine
          imagePullPolicy: Always
          ports:
            - containerPort: 2368
          env:
            - name: url
              value: https://travis.media
… and have it instantly converted to Python:
import pulumi
import pulumi_kubernetes as kubernetes

blog_deployment = kubernetes.apps.v1beta1.Deployment(
    "blogDeployment",
    api_version="apps/v1beta1",
    kind="Deployment",
    metadata=kubernetes.meta.v1.ObjectMetaArgs(
        name="blog",
        labels={
            "app": "blog",
        },
    ),
    spec=kubernetes.apps.v1beta1.DeploymentSpecArgs(
        replicas=1,
        selector=kubernetes.meta.v1.LabelSelectorArgs(
            match_labels={
                "app": "blog",
            },
        ),
        template=kubernetes.core.v1.PodTemplateSpecArgs(
            metadata=kubernetes.meta.v1.ObjectMetaArgs(
                labels={
                    "app": "blog",
                },
            ),
            spec=kubernetes.core.v1.PodSpecArgs(
                containers=[
                    kubernetes.core.v1.ContainerArgs(
                        name="blog",
                        image="ghost:2.6-alpine",
                        image_pull_policy="Always",
                        ports=[
                            kubernetes.core.v1.ContainerPortArgs(
                                container_port=2368,
                            )
                        ],
                        env=[
                            kubernetes.core.v1.EnvVarArgs(
                                name="url",
                                value="https://travis.media",
                            )
                        ],
                    )
                ],
            ),
        ),
    ),
)
Ahh, Python.
Now this should immediately make sense to you if you are familiar with Kubernetes. And remember, this is a requirement that you are already familiar with Kubernetes.
The Kubernetes yaml structure matches up exactly with the Pulumi Python…just in a Python sort of way.
You see apiVersion, kind, metadata, spec, containers, etc.
It’s all there.
Let's Deploy Nginx (Intro)
Okay, let’s try an easy deployment with Nginx.
Step 1: Create and cd into your directory. And create a new project with pulumi new:
mkdir nginx-deployment && cd nginx-deployment && pulumi new kubernetes-pythonAnd the Pulumi CLI will walk you through setting up the project:
- Your project name
- Your project description
- Your stack name
A stack is basically a configuration. You may have a dev stack, a prod stack, or maybe different stacks for different AWS regions.
Note that Pulumi created your Python virtual environment for you and a requirements.txt for package management.
That leaves two files:
- Pulumi.yaml. Consider this your project/stack configuration.
- main.py. This is your code. This defines your stack.
And everything in main.py should make sense to you. There’s a deployment variable containing a Deployment object that includes a name, spec, selectors, replica count, and template. Basic kubernetes, but in Python.
Finally, we export the name which is found in the metadata.
So let’s deploy this with pulumi up:
pulumi up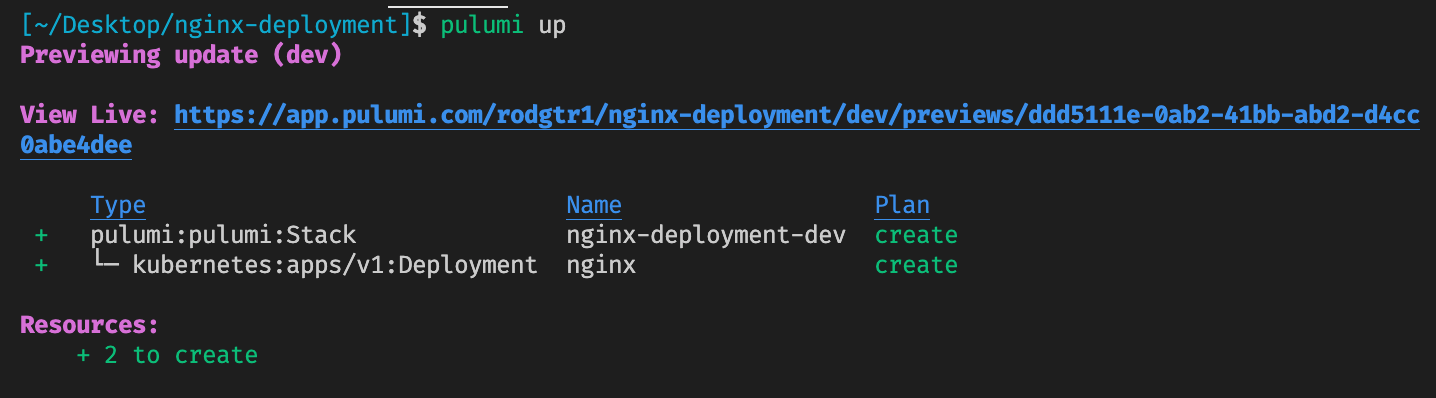
If the configuration looks good, choose yes to perform the action.
Updating and Deleting a Stack
Now let’s say we need 3 running at all times instead of 1.
First, change the code in main.py:
...
replicas=3,
...
Next, run pulumi up again to update.
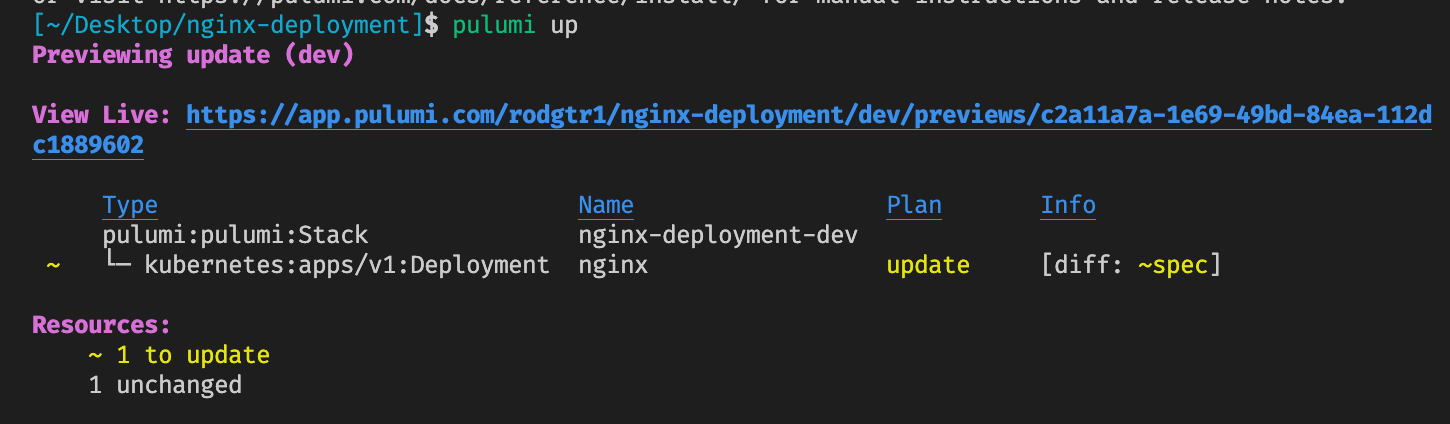
Now note in the Plan and Info columns, it alerts you that it’s an update and also that the diff is in the spec part of the deployment.
Confirm yes to update.
To delete the stack just run pulumi destroy and confirm.
The Pulumi Kubernetes API Is Your Friend
Okay so the burning question has to be, “What if I don’t have the yaml beforehand and need to create the Python from scratch? How do I know what parameters to use?”
The answer is: “Just like any other piece of technology. Read the documentation.”
This is why I continually stress the importance of getting good at reading documentation as a developer. It’s your best friend.
So if you are going to use Pulumi, the API Reference should be bookmarked.
Note on this page cloud providers, infrastructure, database, etc APIs and imagine all you can do with Pulumi and these third party tools!
Now click on Kubernetes, and voila, there you go.
So if you need ConfigMaps, secrets, or pods… thats in the Core module.
If you are looking for Deployments or Stateful Sets… that’s in the Apps module.
A ReplicaSet in apps/v1 in the Pulumi API corresponds with the ReplicaSet apps/v1 apiVersion in the Kubernetes documentation.
Take all that documentation and your Python skills and you should have all the power you need to leverage Pulumi to it’s fullest
Let's Deploy Jenkins (Intermediate)
Okay, let’s try something a bit more involved.
For this, I’m going to point you to a Jenkins Pulumi deployment that I put together in python. Open it up and let me explain it to you. Ignore the number of lines and don’t freak out:
- Let’s start at the top. All the imports at the top keep the actual code clean. If we didn’t have these, then we’d have to prefix everything with
kubernetes.core.v1orkubernetes.app.v1. This is just clean programming. You understand it. - Note on line 32 the instance of Config and credentials object below it. This Pulumi config allows us to set (and get) configuration variables to use in our deployment. In this case, we’ll set a username and password to log into Jenkins. To do this you’ll need to run the commands mentioned below. You can, of course, remove this and go the old Jenkins route where the password is spit out in the logs, but I think this way is much cleaner.
- Third, the code is common Python. There are five functions that make up the bulk of the file: create_service_account(), create_secret(), create_persistent_volume(), create_deployment(), and create_service(). The function names explain what they do and what you are deploying.
- These functions are called at the bottom starting at line 308. Basically, “Create me a service account, secret, persistent volume, deployment and service. Thank you.”
- Everything in the functions should correspond to the kubernetes yaml you are already used to.
To deploy Jenkins:
- Set your username and password variables with the following commands:
pulumi config set username yourusername
pulumi config set password yourpassword
Note that this creates a “dev” Pulumi yaml file that holds these values. 2. Set the nodeName variable in line 40 to the name of one of your Kubernetes nodes. And be sure to create a namespace and set that variable on line 43. 3. Run pulumi up
Finally, go to the URL (which was printed in your terminal), log in, and Jenkins in all its glory awaits you.
Deploying Helm Charts
If you’re using Helm, you can also use Pulumi helm to deploy your charts. Again, consult the API for more information but essentially if you had a chart on your local computer, you could deploy it with:
from pulumi_kubernetes.helm.v3 import Chart, LocalChartOpts

nginx_ingress = Chart(
    "nginx-ingress",
    LocalChartOpts(
        path="./nginx-ingress",
    ),
)
Conclusion
So I hope that was helpful in showing how to use Pulumi to manage Kubernetes. Imagine what you now can do with AWS, Azure, GCP, other third party integrations like Digital Ocean, and continuous delivery with Azure DevOps or CircleCI.
And we didn’t even touch on the Pulumi Kubernetes operator or how great it works in continuous delivery
For many more Pulumi examples, in various languages, do check out the Pulumi Github page.
If you have any questions, let me know below and I look forward to creating some more tutorials on Pulumi in the future.
This page may contain affiliate links. Please see my affiliate disclaimer for more info.