While many developers use Visual Studio for C# development, I still use VSCode. In this post, I’ll show you how to run C# in VSCode, as well as create a project, execute the code, debug, and compile it.
As stated above, I make it a point to use VSCode for as many things as I can get away with.
I feel comfortable in VSCode, know the shortcuts, and just don’t like jumping editors.
I started out with C# in Visual Studio because I was told to. It’s easy, has many, many features, and is what the tutorials told me to use.
Later, I made it a point to become efficient in it with VSCode. I was using it for everything else. Why not with C#? Visual Studio, to me, is just too bulky and has too much going on.
So in this post, I want to help you do the same.
Whether you are just starting out in C# or have decided to switch from Visual Studio to VSCode, I’m going to share with you how to run, debug, execute, and compile your C# code in VSCode.
If you’re learning C#, here are my TOP course recommendations:
- Beginner →
C# Basics for Beginners: Learn C# Fundamentals by Coding
— master C# fundamentals
- Intermediate →
C# Intermediate: Classes, Interfaces and OOP
— classes, interfaces and object-oriented programming (OOP)
- Advanced →
C# Advanced Topics: Prepare for Technical Interviews
— events, delegates, lambda expressions, linq, async/await and more!
Watch the Video?
Before we get started, if you prefer video format, check out the tutorial on YouTube.
Otherwise, continue reading.
How to Run C# in VSCode
1. Install the .NET SDK
First, download and install the .NET SDK. As of writing, the latest LTS version is .NET 8. Download here: https://dotnet.microsoft.com/en-us/download
Then confirm that dotnet is installed by checking the version in a terminal window:
dotnet --version
# 8.0.414 (or whatever version yours is)
Also go ahead and install this C# VSCode extension.
2. Create a new C# project in VSCode
Next, create a new project and open it in VSCode:
dotnet new console -o app
cd app
code . # to open project in VSCode
This will generate a Program.cs file.
In .NET 6+, the file uses top-level statements by default meaning you will only see this line (explanation).:
Console.WriteLine("Hello, World!");That’s it! No namespace, class, or Main method needed.
💡 If you prefer the old explicit Program.cs with Main, you can add the flag:
dotnet new console --use-program-main3. Run Your C# Code in VSCode
To execute your code, simply run:
dotnet run…and you should see Hello World displayed in the console.
💡 Bonus: Try Hot Reload with:
dotnet watch run. This will recompile and reload changes as you edit the file. No need to stop and restart.
4. Debug Your C# Code in VSCode
First, be sure you installed the official C# extension mentioned above. If not, it can be found here.
Next, in VSCode open the Command Palette by going to View > Command Palette (or use the shortcut if you know what it is), and search for .NET: Generate Assets for Build and Debug
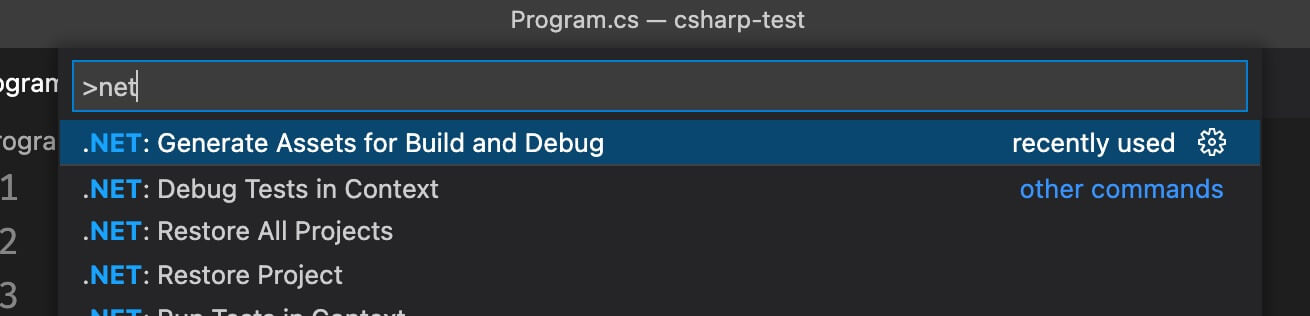
Choosing this will generate a .vscode folder with a prepopulated build configuration in it.
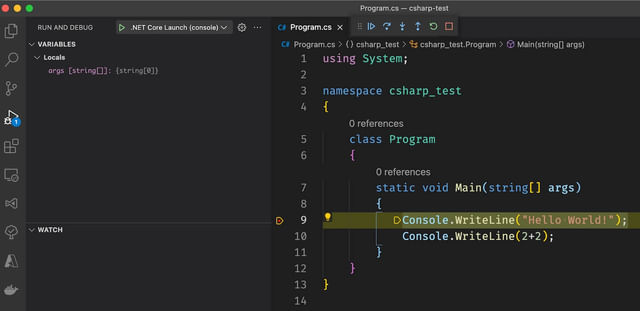
Now go to the “Run and Debug” tab in VSCode, set your breakpoint(s), and click the Play button to debug.
5. Compile Your Code
To compile your code, run:
dotnet buildAfter that is done you will have an executable (exe or dll) in your /bin folder. Depending on your build configuration it may be in a Debug folder or a Release folder.
Conclusion
And that’s how you run C# code in VSCode.
Now build our your code, debug it as needed, run dotnet run to execute your code, and dotnet build to compile it.
Rinse and repeat.
Let me know below if you have any questions.
This page may contain affiliate links. Please see my affiliate disclaimer for more info.