- Coding in the AWS Console is Gross
- Watch the Video?
- What is AWS SAM?
- Our Local Lambda Development Example
- Local Environment Setup
- Creating a Local Lambda Function
- Building a Local Lambda Function
- Invoking a Local Lambda Function
- Deploying a Local Lambda Function
- Updating a Local Lambda Function
- Destroying a Local Lambda Function
- How To Get AWS Certified in 2022: Exact Resources Used
- Conclusion
- Discussion
Coding in the AWS Console is Gross
It’s 2021 and there’s no reason you should be typing your code into the cold, gray AWS Console Lambda Function editor.
You should keep it all in VSCode where it’s pretty, smart, and most importantly, in a familiar environment that beams with productivity.
So how do you develop AWS lambda functions locally with VSCode?
How do you test locally, deploy it to AWS, and update it as needed?
The answer rests with my buddy SAM.
Watch the Video?
Before we get started, if you prefer video, here you go:
Otherwise, continue reading.
What is AWS SAM?
AWS’s definition is great. It states:
The AWS Serverless Application Model (SAM) is an open-source framework for building serverless applications. It provides shorthand syntax to express functions, APIs, databases, and event source mappings. With just a few lines per resource, you can define the application you want and model it using YAML. During deployment, SAM transforms and expands the SAM syntax into AWS CloudFormation syntax, enabling you to build serverless applications faster.
Now what in the SAM Hill does that mean?
Well, API Gateway, AWS Lambda service, and Dynamo DB services are serverless. Serverless means just want it says: There are no servers to manage with these services. The customer is charged only for the computer resources and storage needed to execute the code.
SAM, or Serverless Application Model, is a framework for building these services with ease.
In our particular example, SAM allows us to create Lambda Functions locally and build, test, and deploy them with simple SAM commands.
If that’s over your head, don’t worry. You’ll see the ease of it here shortly.
Our Local Lambda Development Example
Today, we’ll be creating a simple Lambda function locally, invoking it locally, building the dependencies, deploying to AWS, and updating as needed. All with basic SAM CLI commands.
We’ll also define a simple SAM template that works magically with CloudFormation to build and maintain our resources.
You’ll be shocked at all the fun you’ve been missing.
Local Environment Setup
So let’s get our environment set up.
You’ll need VSCode of course.
You’ll need the SAM CLI. Here are the instructions to download that:
```bashbrew tap aws/tap brew install aws-sam-cli```
Finally, you’ll need to have docker running. The easiest path is to just download Docker Desktop. The AWS SAM CLI requires Docker containers to simulate the AWS Lambda runtime environment on your local development environment.
Invoking a function locally with SAM actually spins up a container to execute your code and terminates when finished. Don’t worry you don’t have to do any of that yourself.
Creating a Local Lambda Function
You can run sam init and create a number of predefined templates (which are great by the way), but we’re going to keep it simple and start from scratch.
And we’ll be using Python but feel free to adapt it to the aws-compatible runtime of your choice.
First let’s create a new folder, an app.py, and a template.yaml file:
mkdir lambda-local && cd lambda-local && touch app.py template.yamlThe app.py file is simply our lambda function. Let’s start out with this:
import json

def lambda_handler(event, context):
    first_name = event['first_name']
    last_name = event['last_name']

    message = f"Hello {first_name} {last_name}!"

    return {
        'message' : message
    }
All we’re doing is catching the event, assigning the first and last name values, and printing a Hello.
Next, we’re going to define our template.
This SAM template follows a similar template to that of AWS CloudFormation. In fact, this template will deploy AWS resources via CloudFormation! For reference, the template anatomy can be found here.
Let me post the code and I’ll explain. Add this to the template.yaml file:
AWSTemplateFormatVersion: '2010-09-09'
Transform: AWS::Serverless-2016-10-31
Resources:
  HelloNameFunction:
    Type: AWS::Serverless::Function
    Properties:
      Handler: app.lambda_handler
      Runtime: python3.9
The main thing to point out here is the Resources section. We are creating:
- A resource named HelloNameFunction
- It’s of type AWS::Serverless::Function (lambda function)
- Its properties include a handler and the runtime.
That’s all we need. Of course, you can define other serverless services here like AWS::Serverless::Api (Api Gateway) or AWS::Serverless::SimpleTable (DynamoDB table).
So to conclude, in these two files we have created the Function itself AND the resource which will get deployed via CloudFormation.
Building a Local Lambda Function
Now let’s build the Function. To do so, run:
sam buildNote you now have an .aws-sam folder.
This command builds dependencies and copies your application source code to folders under .aws-sam/build to be zipped and uploaded to Lambda. We don’t have any dependencies but you’ll see the function and the template.
You’ll need to re-run this after making changes to your function or template.
Invoking a Local Lambda Function
Now we can invoke it locally right? Yes, but first we need to create a mock event. Let’s create an events folder with an event json file in it. Here’s we’ll create some mock data to simulate our event. Enter:
mkdir events && cd events && touch events.jsonAnd inside the events.json file, add:
{
  "first_name": "John",
  "last_name": "Smith"
}
This simulates the json that would be sent from an lambda-triggering event.
Run the build function again to update adding the events to the build folder:
sam buildNow let’s invoke the function locally, passing in our events as an argument and function resource name (be sure to cd back into your lambda-local directory if you haven’t already). Remember, as mentioned in the Local Environment Setup above, you need to have docker running:
sam local invoke HelloNameFunction -e events/events.jsonAnd you should see {"message": "Hello John Smith!"} returned in your terminal.
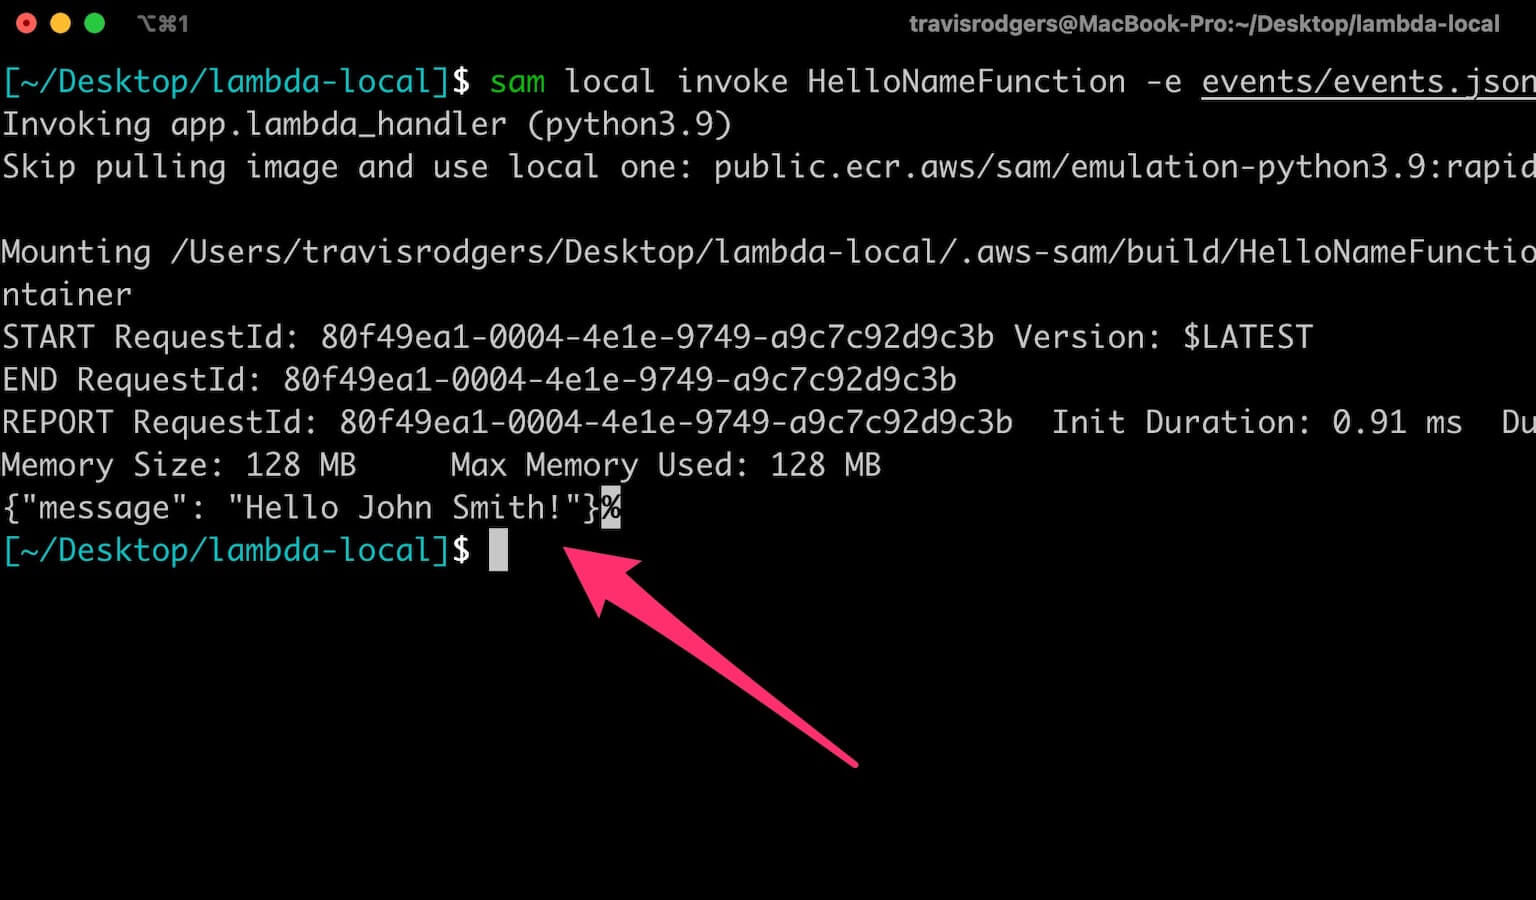
This actually spins up a docker container, runs the function, and spins it down. Neat!
And this is the AWS Lambda function local development process: make changes, build and invoke, make changes, build and invoke. Also updating your events accordingly as needed.
And when you’re ready, let’s deploy this.
Deploying a Local Lambda Function
Now remember, the SAM template will deploy your resources via CloudFormation. So after deploying you can see the stack there.
Also, and this is a one-time creation only and through CloudFormation as well, it creates an S3 bucket with your artifacts in it (function and template). On subsequent deployments, artifacts will be added to this bucket.
Okay, so we’ve built the Function and Resources in the Serverless Application Model, built it, and tested it locally. Now let’s deploy it.
To deploy you first need to be sure you’ve configured your local AWS credentials file to authenticate.
If you use AWS CLI, then just run aws configure and enter your keys. If not, you’ll need to open your ~/.aws/credentials file and add them manually. Step-by-Step instructions can be found here.
Next, it’s simply a matter of running the following command:
sam deploy --guidedThe --guided flag will assist you through the first deployment with the following prompts:
- Stack name - name your stack
- Region - name your region
- Confirm changes before deploy - Do you want to see the changes and approve them before they are deployed? I choose Yes
- Allow SAM CLI IAM role creation. Yes.
- Save arguments (the ones you just made) to configuration file. Yes.
- Name of configuration file. Default
- SAM configuration environment. Default.
Confirm the proposed changeset and watch as your resources are deployed.
It’s really helpful to read up on what can go into the configuration file. You can add env variables and set parameters in your builds and deployments.
Now if you visit CloudFormation you should see a stack for your resources and a stack for the S3 bucket with your artifacts in it.
You also can view your Lambda and other resources in the console.
Updating a Local Lambda Function
So what happens when you make changes locally and want to deploy them?
Let’s try it out by adding a greeting to our Lambda function:
import json

def lambda_handler(event, context):
    first_name = event['first_name']
    last_name = event['last_name']
    greeting = event['greeting']

    message = f"{greeting} {first_name} {last_name}!"

    return {
        'message' : message
    }
Add the value to your mock event:
{
  "first_name": "John",
  "last_name": "Smith",
  "greeting": "Good afternoon"
}
After making the changes rebuild/update by running:
sam buildNow let’s test it again locally to be sure it works:
sam local invoke HelloNameFunction -e events/events.jsonAnd you should get a {"message": "Good afternoon John Smith!"} message to confirm that it works fine.
Now let’s deploy the changes to AWS. Remember that config file we created on the first deployment based on the guided options? Well that holds all the info needed to deploy the changes without any guidance or settings. So you only need to run:
sam deployYou’ll note that a changeset is created in the CloudFormation stack to apply the changes.
And if you check your Lambda, you’ll see the updated code.
Well done.
Destroying a Local Lambda Function
There is no SAM CLI command to destroy a function and its resources from your local environment. It will have to be done either by the AWS CLI (which is what lies under the hood of SAM CLI), or via the console.
The command for the AWS CLI route would be:
aws cloudformation delete-stack --stack-name your-stack-nameAnd to delete the stack via the Console, you would just go to AWS CloudFormation, choose the stack, and hit delete.
How To Get AWS Certified in 2022: Exact Resources Used
**Resources Mentioned**
Udemy:
AWS Certified Solutions Architect: https://geni.us/faQZ
John Bonson Practice Exams: http://bit.ly/2Ngoo2w
WhizLabs - https://geni.us/HJRZB
Conclusion
And that’s how you develop AWS lambda functions locally with VS Code.
Now free yourself from AWS console life and release yourself back into an environment you prefer to work in anyways.
Discussion
Do you develop AWS Lambda functions locally? Do you use SAM? What does your workflow look like? Let’s discuss below in the comments.
This page may contain affiliate links. Please see my affiliate disclaimer for more info.
