- What is Pulumi?
- AWS Management With Pulumi
- Setup
- Let's Deploy an S3 Bucket (Intro)
- The Pulumi AWS API Is Your Friend
- Let's Deploy a Lambda that Sends an Email via SNS each morning (Intermediate)
- 1. Creating our Lambda function (code)
- 2. Creating our Lambda role
- 3. Creating our SNS topic
- 4. Subscribing our Email to the Topic
- 5. Updating and Deleting a Stack
- The Obvious Benefits
- Looking for a Pulumi Kubernetes Tutorial?
- Conclusion
What is Pulumi?
To understand Pulumi, you have to understand Infrastructure as Code.
What is Infrastructure as Code? As I stated in my Pulumi Kubernetes tutorial:
I love Red Hat’s simple definition: “Infrastructure as Code (IaC) is the managing and provisioning of infrastructure through code instead of through manual processes.”
IaC allows you to describe your infrastructure as code, version control it with Git, and have it produce the same results with each deployment.
Examples include AWS CloudFormation, Azure ARM templates, Terraform, and … Pulumi. The first two are specific to that cloud environment while the latter two are cloud-agnostic.
And what sets Pulumi apart from Terraform is it allows you to write and maintain your code in a language of your choosing (Go, Python, JavaScript, C#, etc.). There are additional perks with Pulumi like state management and support for cloud-native technologies, but we won’t get in the weeds here.
AWS Management With Pulumi
In addition to services like Azure, Kubernetes, etc., there’s a Pulumi SDK for programming against all things AWS.
This is what we’ll target specifically in this tutorial.
Setup
First, knowledge of AWS is required. Pulumi doesn’t teach you AWS. It gives you tools to better manage it. You’ll need to be familiar with the AWS services enough to understand the correlation of configuration between AWS and Pulumi.
For example, let’s consider SNS. You should know that within SNS there are Topics and that people can subscribe to topics to receive alerts. And when it comes to using Pulumi, you should know to look in their API for Topics and Subscriptions. Hope that makes sense.
Second, you’ll need to install Pulumi:
Windows:
choco install pulumiMac:
brew install pulumiLinux:
curl -fsSL https://get.pulumi.com | shNext, we’ll be using Python for these examples so you’ll need to be sure Python is installed.
And finally, you’ll need an AWS account and will need to be authenticated. If you have the AWS CLI, this is as easy as running aws configure and entering your key, secret, region, and preferred output format at the prompts. If not, then refer to this article to set up your local credentials file manually.
Let's Deploy an S3 Bucket (Intro)
Let’s do this simple exercise to see how Pulumi works.
Step 1: Create and cd into a new directory. And create a new project with pulumi new:
mkdir s3-deployment && cd s3-deployment && pulumi new aws-pythonThe Pulumi CLI will walk you through setting up the project:
- Your project name - any project name will do
- Your project description - any description
- Your stack name - can leave it as dev
- AWS region - your region
A stack is basically a configuration. You may have a dev stack, a prod stack, or maybe different stacks for different AWS regions.
Note that Pulumi created your Python virtual environment for you and a requirements.txt for package management.
That leaves three files to mention:
- Pulumi.yaml. Consider this file as defining your project.
- Pulumi.dev.yaml. Contains configuration values for the stack you created.
- main.py. This is your code. This defines your stack.
And everything in main.py should make sense to you. We import pulumi and s3 from pulumi_aws, we create an s3 bucket named ‘my-bucket’ and export the name.
So let’s deploy this with the pulumi up command:
pulumi upIf the configuration looks good, choose yes to perform the action.
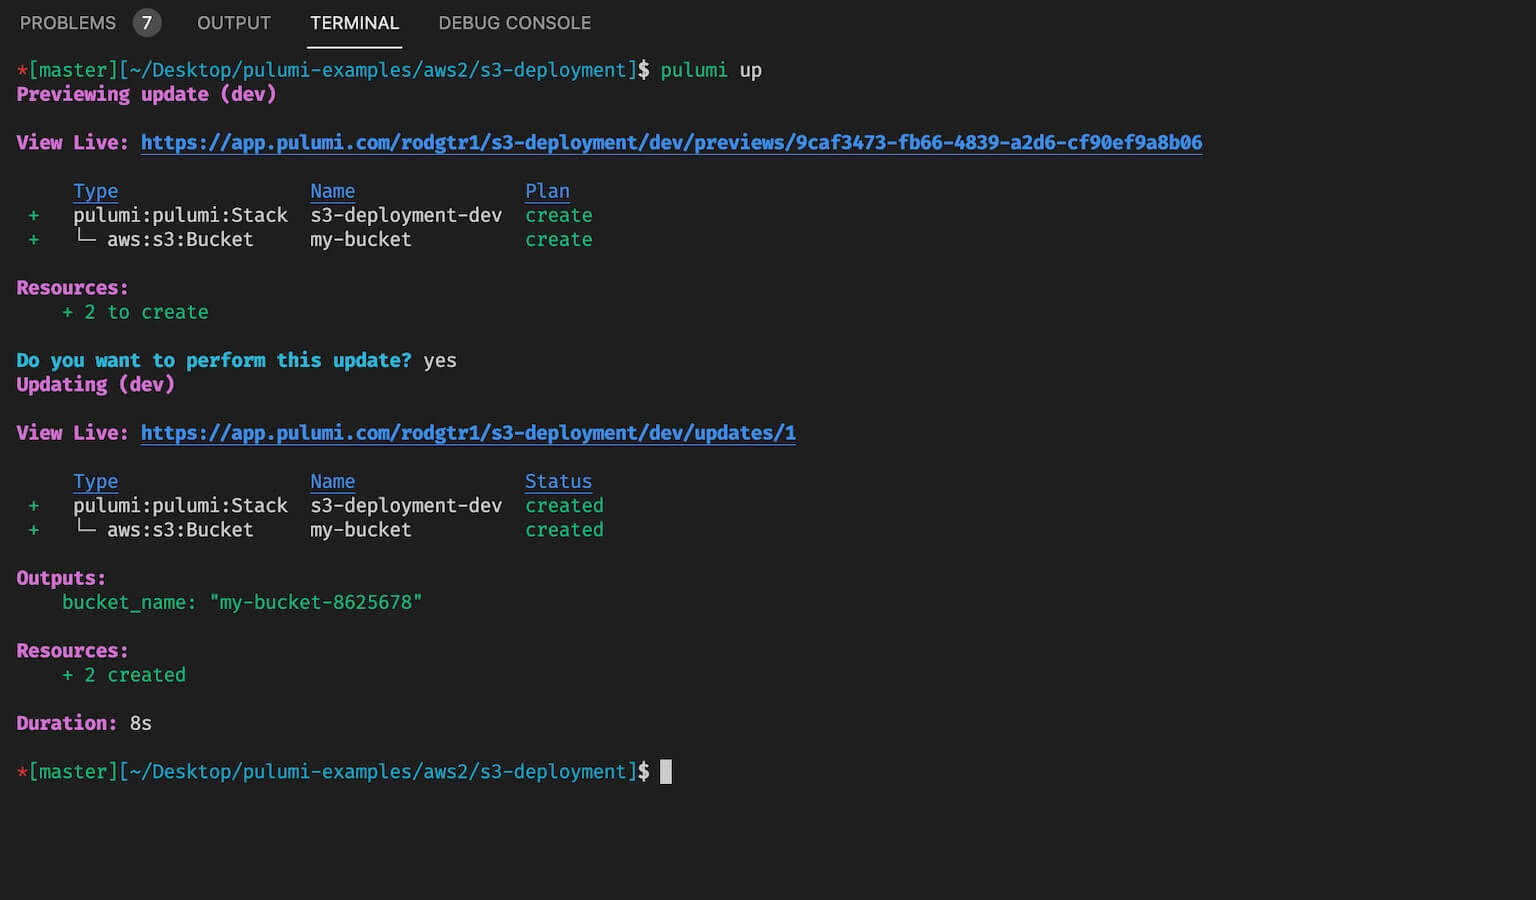
Now you have an s3 bucket in AWS and a Pulumi stack to maintain it. We’ll learn to update stacks in a bit.
The Pulumi AWS API Is Your Friend
So you must be wondering now, “How do I know the syntax of the AWS services I want to deploy? What if I want a Lambda function, or a DynamoDB table? How do I know what parameters to use?”
The answer is: “Just like any other piece of technology. Read the documentation.”
This is why I continually stress the importance of getting good at reading documentation as a developer. It’s your best friend and opens all doors.
So if you are going to use Pulumi, the API Reference should be bookmarked.
Note on this page: Cloud providers, infrastructure, database, etc APIs and imagine all you can do with Pulumi and these third party tools!
Now click on AWS, and voila, there you go.
If you want to add files to our s3 bucket, just click on s3 and BucketObject. There you’ll see an example as well as all the parameters.
If you want to add an EC2 instance, click on ec2 and choose Instance. Again, you’ll get an example as well as all the parameters needed.
One thing that really helps me out is opening the service I want to create in the AWS console, and looking at the parameters that I would be setting up, and pairing those up with the Pulumi code.
Take all that documentation and your Python skills and you should have all the power you need to leverage Pulumi to it’s fullest
Let's Deploy a Lambda that Sends an Email via SNS each morning (Intermediate)
So let’s try something a bit more challenging.
We’re going to create a Pulumi stack defining a Lambda function that will fire every morning at 7 AM and send you an email via AWS’s Simple Notification Service.
(This will be a simple ‘Hello’ email but if you want to have it include the day’s weather, Bitcoin price, Google calendar events, and a positive quote, then you can adapt the code from a previous video I put together about automating your mornings.)
The steps for this project will include:
- Define the Lambda function (code).
- Define the Lambda Role
- Define the SNS
- Defining the Lambda function (infrastructure)
- Defining the Cron Trigger
- Subscribing our email to the SNS Topic
We’re going to do two things.
- We’ll grab the Lambda code directly from the Pulumi examples to see how it works and add our own additional parameters.
- We’ll use the API documentation to figure out the SNS Topic and Email.
1. Creating our Lambda function (Code)
First, let’s create a new project using the same aws-python template: (You could also run pulumi new by itself and choose a template to get started with)
mkdir pulumi-lambda && cd pulumi-lambda && pulumi new aws-pythonNote that this is the same layout as the s3 project we created above.
So we’ll open main.py and just add our code accordingly, removing the s3 information.
For our Lambda, let’s take a look at the Pulumi examples Github repo to get a baseline of how to create our Lambda functions. This repo is your best friend and will get you started with many AWS (and other) services in a variety of languages.
The example can be found here.
From this example page, we’ll need the lambda role, role policy attachment, and lambda function. That’s it.
But first, let’s create our actual lambda function and put it in an app folder:
mkdir app && cd app && touch index.py && cd ..And inside the index.py let’s add a simple function that publishes to SNS. Note that the SNS Topic will be an environment variable which we’ll declare with our stack deployment.
import json
import boto3
from botocore.exceptions import ClientError
import os

def lambda_handler(event, context):
    client = boto3.client('sns')

    try:
        response = client.publish(
            TopicArn=os.environ['topic_arn'],
            Message='Test from SNS',
            Subject='Hey You',
        )
    except ClientError as error:
        print(f"Error publishing message: {error}")
    else:
        return {
            "statusCode": 200,
            "body": json.dumps({
                "response": response,
            }),
        }
So if we look back at the pulumi example we can take this exact code and dress it up in a Python sort of way and accommodate for our scenario.
First, let’s create the Lambda role, the SNS policy, and attach the policy to the role. We’ll also call this function first at the bottom of the file and assign the result to a variable:
2. Creating our Lambda Role
import pulumi
import pulumi_aws as aws
import json

# Create the role for the Lambda to assume
def create_lambda_role():
    # Create the role
    lambda_role = aws.iam.Role("lambdaSNSRole",
        assume_role_policy=json.dumps(
        {
            "Version": "2012-10-17",
            "Statement": [
                {
                    "Action": "sts:AssumeRole",
                    "Principal": {
                        "Service": "lambda.amazonaws.com",
                    },
                    "Effect": "Allow",
                    "Sid": "",
                }
            ]
        }))

    # Create policy to publish to SNS
    sns_policy = aws.iam.Policy("publish-sns-policy",
        description="A test policy",
        policy="""{
            "Version": "2012-10-17",
            "Statement": [
                {
                "Action": [
                    "sns:Publish"
                ],
                "Effect": "Allow",
                "Resource": "*"
                }
            ]
        }
    """)

    # Attach SNS policy to our lambda role
    role_policy_attachment = aws.iam.RolePolicyAttachment("lambdaRoleAttachment",
        role=lambda_role.name,
        policy_arn=sns_policy.arn)

    # Return role so we can use it as a variable
    return lambda_role

# Call functions at the bottom in the order listed. This is first.
lambda_role = create_lambda_role() # - #1
3. Creating our SNS Topic
Next, we’ll need to create an SNS topic.
If we look at our Pulumi API documentation, and choose sns we’ll immediately see a resource called Topic. And look, there’s a lovely example for us to use. And from the documentation we see that resource_name is the only required field, so we’ll run with that only for now.
So let’s add a create_topic function below the role function and call it second at the bottom:
...
def create_topic():
    morning_updates_topic = aws.sns.Topic("morningUpdates")

    # Return it so we can use as lambda environment variable
    return morning_updates_topic

...
morning_updates = create_topic() # - #2
4. Creating our Lambda function (Infrastructure)
Next, let’s create our lambda function and call the function at the bottom of the file below the other two calls. Note that our topic_arn will be a lambda environment variable.
...
def create_lambda_function(role_arn, morning_updates_arn):
    lambda_function = aws.lambda_.Function("lambdaFunction",
        code=pulumi.AssetArchive({
            ".": pulumi.FileArchive("./app"),
        }),
        environment={
            "variables": {
                'topic_arn': morning_updates_arn
            },
        },
        runtime="python3.8",
        role=role_arn,
        handler="index.lambda_handler")

    return lambda_function

...
# Passing in the lambda role arn and morning_updates topic arn as params
lambda_function = create_lambda_function(lambda_role.arn, morning_updates.arn) # - #3
5. Creating our Cron Trigger
Next, we’ll need a trigger for our Lambda to fire once every morning at 7. We do that with EventBridge which can act as a Cron. For that, we’ll look at the CloudWatch module and specifically EventRule, EventTarget, and EventPermission:
...
def create_cron_trigger(lambda_function):
    # Create the trigger
    morningTrigger = aws.cloudwatch.EventRule("morningTrigger",
        description="Trigger lambda at 7 each morning",
        schedule_expression="cron(0 7 * * ? *)")

    # Set the Event Target (our Lambda)
    lambda_target = aws.cloudwatch.EventTarget("lambdaEventTarget",
        rule=morningTrigger.name,
        arn=lambda_function.arn)

    # Give permissions for events to invoke Lambda
    event_permission = aws.lambda_.Permission("eventPermission",
        action="lambda:InvokeFunction",
        function=lambda_function.name,
        principal="events.amazonaws.com",
        source_arn=morningTrigger.arn)

...
# Passing our lambda_function as a parameter
cron_trigger = create_cron_trigger(lambda_function) # - #4
6. Subscribing our Email to the Topic
Finally, let’s subscribe ourselves to the Topic. Be sure to replace the endpoint with your own email:
...
def subscribe_to_topic(topic_arn):
    morning_updates_sqs_target = aws.sns.TopicSubscription("morningUpdates",
    endpoint="[email protected]",
    protocol="email",
    topic=topic_arn)

...
# Passing in the topic arn as a parameter
subscribe_to_topic(morning_updates.arn) # - #5
So to reiterate we simply:
- Defined the Lambda function (code).
- Defined the Lambda Role
- Defined the SNS
- Defined the Lambda function (infrastructure)
- Defined the Cron Trigger
- Subscribed our email to the SNS Topic
Here is the final code for you to double check
And now that we’ve defined all the resources for this project, let’s deploy it by running pulumi up.
Remember to confirm your email subscription to the topic after deploying.
Updating and Deleting a Stack
Updating a stack with Pulumi is as easy as making changes and running pulumi up again.
So let’s make a simple change to our Lambda function changing our Message:
...
    Message='A NEW Test from SNS',
...
Now run pulumi up and confirm the suggested changes to deploy.
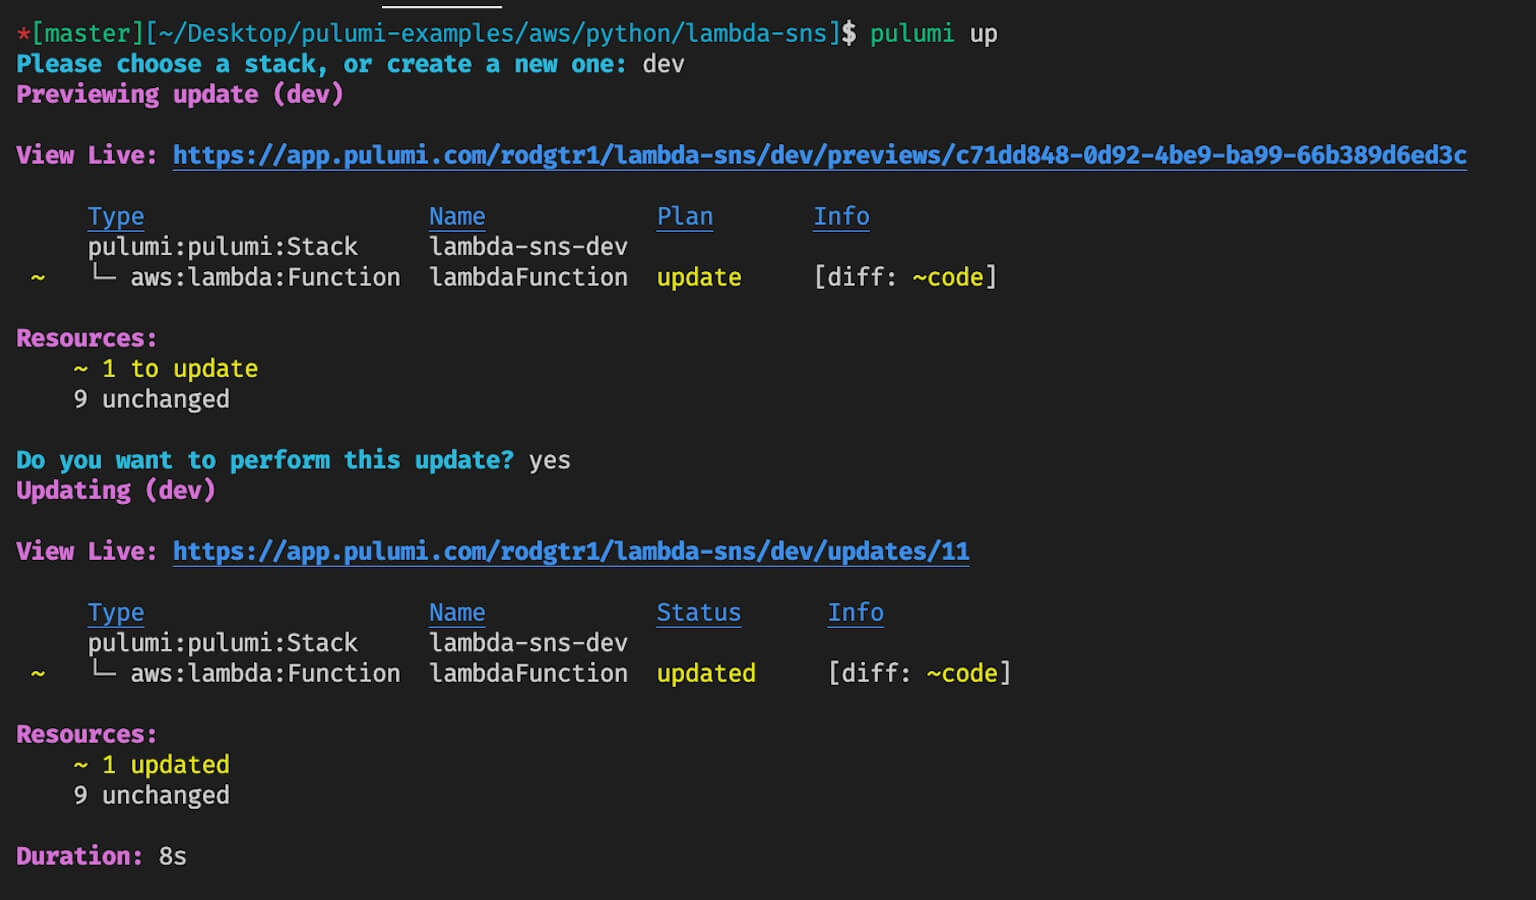
Your stack has been updated in AWS! Great!
And to delete the stack just run pulumi destroy and confirm.
The Obvious Benefits
Now that you have a Pulumi stack that creates a Lambda that can send emails via SNS, the benefits abound and include among many:
- You can pass this to a friend or co-worker who can create the exact same setup with a single command.
- It’s in a language that you and your team are familiar with.
- You can easily add resources to it or update it as needed down the road.
Looking for a Pulumi Kubernetes Tutorial?
If you are looking for a step-by-step Pulumi Kubernetes Tutorial, check out my complete guide.
Conclusion
So I hope that was helpful in showing how to use Pulumi to manage AWS. Imagine what you now can do with Kubernetes, Azure, GCP, other third-party integrations like Digital Ocean, and continuous delivery with Azure DevOps or CircleCI.
For many more Pulumi examples, in various languages, do check out the Pulumi Github page.
If you have any questions, let me know below and I look forward to creating some more tutorials on Pulumi in the future.
This page may contain affiliate links. Please see my affiliate disclaimer for more info.