
If you use Claude Code, you’ve probably hit Shift+Tab a few times and watched the mode label change without being totally sure what each one actually approves. And once you settle on a mode, a bigger question shows up: when you want a hard rule like “never run rm,” where does that rule go, and does Claude still respect it when you’re running in bypass mode?
Short version: the rule goes in settings.json as a deny rule, every mode respects it (including bypass), and if you want a true guarantee instead of pattern matching, you add a hook.
The permission modes, one by one
Claude Code currently ships with six permission modes. Four of them are the ones you’ll actually cycle through day to day.
Manual mode (default). The starting point. Claude can read files and run read-only commands like ls, cat, and grep without asking. Anything that changes state (file edits, writes, most Bash commands, network requests) triggers a prompt. This is the right mode when you’re new to a codebase or working on anything production-adjacent.
Accept edits (acceptEdits). Everything manual mode allows, plus file edits are auto-approved, along with common filesystem commands like mkdir, touch, mv, cp, and yes, rm, as long as they stay inside your working directory. Edits outside the project scope and protected paths like .git and .bashrc still prompt. This is my default for normal feature work.
Plan mode (plan). Read-only, like manual mode, but Claude researches and presents a plan for approval before touching anything. Great for big refactors where you want to see the approach first.
Auto mode (auto). The newer one. Claude runs everything without prompting, but with background safety checks that classify risky actions. Truly destructive stuff, like removals targeting / or your home directory, still triggers a prompt. It’s only available on recent models and doesn’t appear in the Shift+Tab cycle until your account qualifies.
Bypass permissions (bypassPermissions). Nothing prompts and everything runs. You have to opt in at startup with claude --permission-mode bypassPermissions or the more honestly named --dangerously-skip-permissions flag. Meant for containers and sandboxed CI environments, not your laptop.
There’s also a sixth, dontAsk, which flips the model: instead of prompting for unapproved actions, it just denies them. Useful for unattended runs where a hanging prompt is worse than a refusal.
You switch modes three ways: Shift+Tab cycles through them in-session, claude --permission-mode acceptEdits sets one at launch, and "defaultMode": "acceptEdits" in your settings makes it permanent. The full breakdown lives in the permission modes docs.
Where custom rules live: settings.json
Now the part most people get wrong. Custom rules are not hooks by default, and they’re not something you put in CLAUDE.md and hope for. They’re permission rules in settings.json, and there are three kinds: allow, ask, and deny.
{
  "permissions": {
    "allow": ["Bash(npm run build)", "Bash(git status)"],
    "ask": ["Bash(git push *)"],
    "deny": ["Bash(rm *)", "Read(.env)"]
  }
}
The syntax is Tool(specifier). For Bash, wildcards work at the start, middle, or end: Bash(npm *) matches any npm command, Bash(git * main) matches git commands ending in main. You’ll also see the colon form Bash(rm:*), which is equivalent to a trailing wildcard.
Which file you put rules in depends on scope:
| File | Scope |
|---|---|
~/.claude/settings.json | You, every project |
.claude/settings.json | Everyone on this repo (committed) |
.claude/settings.local.json | Just you, this repo (gitignored) |
A rm ban belongs in ~/.claude/settings.json so it follows you everywhere. You can also manage rules interactively with the /permissions command inside a session, which I covered along with the other essentials in my Claude Code commands post.
Which modes actually follow your rules?
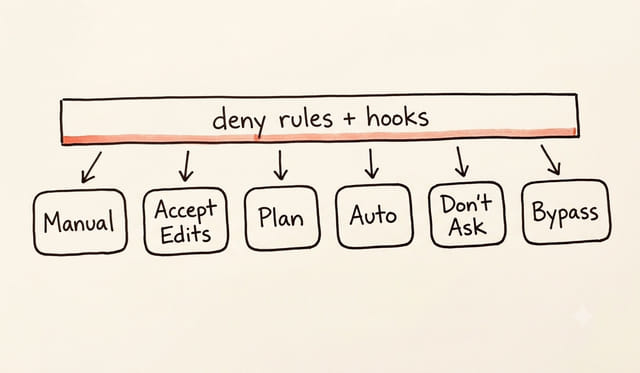
All of them. This is the question everyone asks and the answer is buried in the docs, so here it is plainly: deny rules and explicit ask rules apply in every mode, including bypassPermissions. The docs state it directly. Allow rules are the only ones that become irrelevant in bypass mode, because everything is already approved there.
So a "deny": ["Bash(rm *)"] rule blocks rm in manual mode, accept edits, plan, auto, dontAsk, and bypass. Modes change what gets auto-approved. Deny rules sit above all of that.
The catch: deny rules are pattern matching
Before you call it done, know what Bash(rm *) can and can’t catch. It’s string matching against the command, not a sandbox. The good news: Claude Code canonicalizes commands, so /bin/rm still matches an rm rule, and compound commands like rm file && npm test are evaluated per subcommand, so the rm piece gets caught.
The gaps: command substitution like $(rm -rf something) inside another command is parsed separately and can slip past a pattern, and a command built from a variable won’t match either. For everyday guardrails against Claude casually reaching for rm, deny rules are plenty. For a hard guarantee, you want a hook.
Hooks: the real guarantee
A PreToolUse hook is a script that runs before every tool call, sees the full command, and can veto it. Unlike permission rules, it’s your code making the decision, so nothing slips through on a technicality. Hooks run in every mode, and a blocking hook even overrides allow rules.
Register it in settings.json:
{
  "hooks": {
    "PreToolUse": [
      {
        "matcher": "Bash",
        "hooks": [
          {
            "type": "command",
            "command": "$HOME/.claude/hooks/block-rm.sh"
          }
        ]
      }
    ]
  }
}
And the script itself:
#!/bin/bash
# Reads the tool call as JSON on stdin, exits 2 to block
command=$(jq -r '.tool_input.command // ""')

if echo "$command" | grep -qE '(^|[;&|`$( ])rm([ ;&|]|$)'; then
  echo "rm is blocked by policy. Use trash or move to a backup dir instead." >&2
  exit 2
fi

exit 0
Exit code 2 blocks the call, and whatever you print to stderr goes back to Claude as the reason, so it can adjust course instead of retrying blindly. Exit 0 with no output means “no opinion, run the normal permission flow.” The hooks docs cover the richer JSON output format if you want allow, ask, and deny decisions from one script.
Make it executable with chmod +x and every rm attempt gets stopped cold, in any mode, with a message telling Claude what to do instead.
What I’d actually set up
For most people the answer is both, and it takes five minutes:
- Add
"deny": ["Bash(rm *)", "Bash(sudo *)", "Read(.env*)"]to~/.claude/settings.json. Cheap, declarative, follows you across projects. - If a command would genuinely hurt you (production credentials, a shared database, anything irreversible), back it with a PreToolUse hook. That’s the layer that holds even against edge cases.
- Pick your daily mode based on trust: accept edits for normal work, manual for unfamiliar or sensitive repos, and save bypass for containers and isolated worktrees where the blast radius is zero.
Modes decide what Claude can do without asking. Rules decide what Claude can never do. Keep those two ideas separate and the whole permission system clicks.
Claude Code Permission Modes FAQ
Does bypass mode ignore deny rules?
No. Deny rules and explicit ask rules are enforced in every permission mode, including bypassPermissions. Only allow rules become irrelevant in bypass mode, since everything else is already approved.
Should I use a deny rule or a hook to block a command?
Use a deny rule in settings.json for everyday guardrails; it is declarative and takes one line. Use a PreToolUse hook when you need a hard guarantee, since hooks run your own code against the full command and a blocking hook overrides even allow rules.
How do I switch between permission modes?
Press Shift+Tab to cycle modes in a session, pass --permission-mode at launch, or set defaultMode in settings.json. Bypass mode is the exception: it must be enabled at startup with --permission-mode bypassPermissions or --dangerously-skip-permissions.
This page may contain affiliate links. Please see my affiliate disclaimer for more info.